

A dead car battery can instantly derail your day, leaving you stranded and frustrated. Fortunately, a portable jump starter offers a quick, reliable solution. These compact devices allow you to revive your battery without relying on the kindness of strangers or paying for a tow. If you have an Amproad jump starter, you're already prepared. Let’s walk through the steps to use it effectively, so you're ready to handle a dead battery with confidence.
Step 1: Ensure Your Portable Jump Starter Is Prepared for Action
Before diving into jump-starting your car, it's essential to ensure your portable jumper starter is prepped and ready for action. Amproad jump starters often come with handy battery level indicators, allowing you to check their readiness at a glance. Give it a once-over to confirm all components are intact and functioning. While Amproad is a trusted car battery jump starter manufacturer known for designing reliable units, it's always wise to double-check before embarking on the jump-starting process. Assuming you're geared up with an Amproad jump starter that's good to go, you're well on your way to conquering dead car batteries like a seasoned pro. Now, let's move on to the next step and get that engine roaring again.
Step 2: Make the Connection
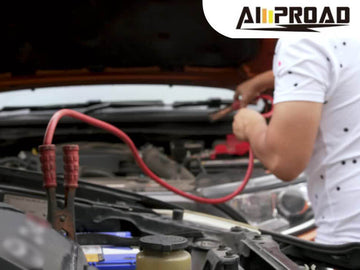
Once your portable jump starter is prepared, the essential question arises: which connections come first? Simplifying the process, begin with the positive cable, typically red. Connect it to your car's dead battery's positive terminal. Take the other end and attach it to your jump starter's positive terminal. Then, handle the negative cable, usually black. Instead of connecting it to the dead battery's negative terminal, find a metal surface on the car's frame. This avoids sparks. Connect the negative cable to its spot on your Amproad jump starter. These steps, prioritizing safety, establish a secure connection for a successful jump-start, particularly with a reliable jump starter like those from Amproad. Positive to positive, negative to metal, and you're ready to revive that dead battery. Keep the momentum going!

Step 3, Connect the Car Jump Starter
Let's specify where to link your jumping starter. Your car's battery features two terminals: positive (+) and negative (-). Initiate with the positive side, often marked with a red cap or a plus sign. Connect the red (positive) cable from your Amproad vehicle battery booster to this terminal.
Next, identify the negative (-) terminal on your car's battery. However, instead of attaching the black (negative) cable from your car battery boosterhere, locate an unpainted metal surface on your car's frame. This minimizes sparks near the battery, enhancing safety. Fasten the black cable to this metal surface, ensuring a robust connection.
On your Amproad jump starter, link the negative cable to its designated spot. This systematic approach ensures a secure and safe connection, averting any mishaps during the jump-starting process. With these connections established, you're poised to infuse life back into your vehicle's battery. Prepare to confidently hit the road again!
Step 4, Turn On the Portable Jump Starter
With your jump starter now securely connected, the subsequent step is to power it up – and it's a straightforward process. Most jump starters, including those from Amproad, feature a power button; locate it and turn on the jump starter. Many models come with indicator lights, so keep an eye out for those. If your Amproad jump starter has a specific activation process, consult the user manual for guidance.
Once activated, the car jump starter stands ready to transfer its life-giving energy to your car's battery. The power button typically follows a user-friendly design, making it simple for you to take control and kickstart your vehicle. With a straightforward press, you've unleashed the power of your portable jump starter, paving the way to revive your car's previously dead battery. Now, are you ready for the next step? Let's bring that engine back to life!

Step 5, Make Sure the Engine Ready for Jump-Starting
Your portable jump starter is humming with power, it's time to ensure your vehicle's engine is prepped for the jump-start. Begin by confirming that both the jump starter power bank and your car are in the "off" position. Double-check that headlights, interior lights, and any accessories are turned off too. If your car has an automatic transmission, ensure it's in "Park." For manual transmissions, set it to "Neutral" and engage the parking brake. This additional step prevents unexpected movements during the jump-starting process, adding an extra layer of safety.
With these precautions in place, your car is ready for the jump-start. Remember, safety is key throughout this process. By ensuring the engine and all systems are in the proper state, you set the stage for a smooth and successful jump-start. Now, let's move on to the exciting part – bringing that engine back to life with the power of your trusty jump starter!
Step 6, Start the Vehicle
You've got your portable jump starter connected, the engine is prepped, but when is the perfect moment to start your vehicle? Here's the trick: after turning on the jump starter, wait a few moments. Let it work its magic and transfer some charge to your car's battery. Most experts recommend waiting around 5-10 minutes.
During this short wait, you might notice some indicator lights on your jump starter changing – that's a good sign. Once the brief waiting period is over, attempt to start your vehicle. If all goes well, and your Amproad jump starter is up to the task, your engine should roar back to life.
Remember, patience is key. Giving the jump starter a few minutes to do its thing ensures a more effective jump-start. Now, go ahead, turn that key or push that ignition button, and revel in the success of bringing your car back to life with the help of your trusty jump starter!
Post-Jump-Start Routine
After successfully jump-starting your car, a few steps are crucial to wrap up the process and ensure a smooth transition back to regular driving. Firstly, allow your vehicle to run for a brief period. This gives the alternator the chance to charge up your car's battery, offering it a boost after its recent workout with the jump starter. Keep a close eye on the dashboard lights – they provide cues about your car's charging status.
Once you've let the engine run for a few minutes, turn off your car. Begin disconnecting the jump starter in the reverse order of how you connected it. Start with the negative cable from the car's frame, then the negative cable on the jump starter. Move on to the positive cables – car first, then jump starter.
Stow away your portable jump starter, and you're ready to hit the road. With an Amproad jump starter, a reliable companion in such situations, consider driving around for a bit to ensure your battery gets fully charged. Following these steps not only revives your car but also demonstrates your mastery of the post-jump-start routine. Enjoy the confidence of knowing you can handle dead batteries with ease, thanks to your portable jump starter!

How to Store and Maintain the Portable Jump Starter?
After you've learnt how to boost a car, to ensuring your portable jump starter is always ready involves proper storage and maintenance practices. When not in use, store it in a cool, dry place, avoiding extreme temperatures that can impact battery performance. Keep the jump starter fully charged, with periodic top-ups to maintain its readiness.
Regularly check the indicator lights or charge level to gauge the jump starter's status. Verify the functionality of additional features, such as built-in flashlights or USB ports, through periodic testing. Consider recharging the jump starter every few months, even if unused, to ensure reliability during unexpected battery issues. Always refer to the manufacturer's guidelines for specific maintenance instructions, as different models may have unique requirements.
Maintaining these simple practices keeps your portable jump starter in top shape, ready to spring into action when your car battery needs a boost. A well-maintained jump starter is your reliable ally in navigating unexpected car troubles.
When using a portable jump starter, observing precautions is crucial. Before connecting cables, ensure both vehicles are turned off, and double-check the jump starter's compatibility with your vehicle, following the manufacturer's guidelines. Avoid touching the metal clamps together during connection to prevent sparks. After a successful jump-start, disconnect the cables in the reverse order of connection, prioritizing safety. If uncertain, consult the user manual or seek professional assistance to confidently and safely navigate the jump-starting process.
Encountering issues during jump-starting is common, but troubleshooting ensures a smoother experience. If the engine doesn't start, recheck cable connections and ensure they are secure. If issues persist, your vehicle's battery may need professional attention. If the battery booster doesn't turn on, confirm its charge level and recharge if necessary. If problems persist, consult the user manual or contact the manufacturer for further guidance. Familiarity with troubleshooting equips you to handle unexpected hurdles and make the most of your portable jump starter.
How to Recharge the Portable Jump Starter?
Once you've successfully jump-started your vehicle, the next crucial step is to recharge your portable jump starter for future use. Conveniently, most models, including those from Amproad, come equipped with a charging cable that easily plugs into a standard wall outlet or a car's 12V power port. Connect the cable to the input on the jump starter and initiate the charging process.
Keep a close eye on the indicator lights – they serve as visual cues during the charging process, often changing color or blinking to signify various stages. Once fully charged, the lights will stabilize or display a distinct color, indicating readiness. While charging times may vary, it typically takes a few hours to complete.
Regularly recharging your portable jump starter is a simple yet vital practice. This ensures that it's always ready and fully charged when you need it, providing peace of mind during unexpected car troubles. By adhering to this routine, you maintain a reliable companion in your Amproad jump starter, ready to tackle dead batteries and get you back on the road with confidence.