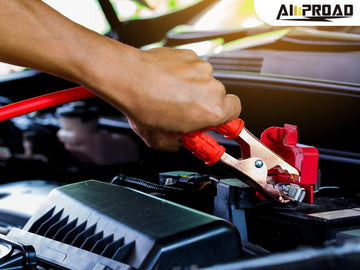
To effectively jump-start your car and turn a frustrating situation into a quick solution, you'll need a few essential tools. Jumper cables are the classic choice, serving as a lifeline to revive your vehicle with the assistance of another car. On the other hand, a portable jump starter offers a self-sufficient alternative, allowing you to get back on the road without needing another vehicle. Keeping these tools in your car is crucial for tackling unexpected battery issues. Their significance lies in their ability to help you resume your journey swiftly, providing reassurance during a common automotive setback. Whether you choose jumper cables or a portable car jump starter, having the right equipment on hand ensures that jump-starting your car remains a straightforward and hassle-free experience.
How Do You Properly Connect Jumper Cables?
Begin by parking the working vehicle close enough to the one with the dead battery, but ensure they don't touch. Turn off both vehicles and locate their batteries.
Identify the positive (+) and negative (-) terminals on each battery. The positive terminal is usually red and marked with a "+," while the negative terminal is black and marked with a "-."
Grab your jumper cables, ensuring they're untangled and the clamps aren't touching each other. Start by connecting the red (positive) clamp to the positive terminal of the dead battery.
Next, attach the other red clamp to the positive terminal of the working battery.
Now, connect the black (negative) clamp to the negative terminal of the working battery.
Instead of attaching the remaining black clamp to the negative terminal of the dead battery, find an unpainted metal surface under the hood of the dead car. This helps prevent sparks near the battery.
Start the working vehicle and let it run for a few minutes. Then, attempt to start the dead vehicle. If successful, carefully disconnect the cables in reverse order.
Ensuring a safe and effective connection, especially when you need to know how to boost a car, involves following these steps precisely, avoiding touching the metal parts of the cables, and never letting the clamps touch each other. This process guarantees a successful jump-start without compromising safety. Remember, if you're unsure, seek professional assistance or use a portable jump starter for a standalone solution.

Can You Use a Portable Jump Starter?
In today's fast-paced world, the convenience of portable jump starters, such as the innovative Amproad, has become increasingly apparent. These compact devices have revolutionized the way we deal with unexpected car battery issues, providing a quick and hassle-free solution. The Amproad portable starter jumper, with its user-friendly design, has made it accessible for drivers of all levels of expertise. Its compact size allows it to fit conveniently in the trunk of your car, ensuring you're always prepared for unexpected battery mishaps. This modern solution eliminates the need for traditional jumper cables and a second vehicle, allowing you to jump-start your car independently, saving both time and the inconvenience of relying on others.
Using the Amproad portable jump starter is a straightforward process, even for those with limited technical knowledge. To perform a standalone jump start, begin by ensuring the Amproad jump starter is adequately charged. Connect the red clamp to the positive terminal of your car's battery and the black clamp to the negative terminal. Once securely connected, turn on the Amproad jumper starter and start your vehicle. The compact design and clear instructions of the Amproad make this process user-friendly, providing drivers with a reliable and efficient solution to get back on the road without the stress of a dead battery. The convenience and simplicity of the Amproad portable jumper box have made it an essential tool for any driver, offering peace of mind in the face of unexpected car troubles.
Are There Safety Precautions to Consider?
Jump-starting your car can be a lifesaver in a pinch, but it's crucial to prioritize safety to avoid accidents or damage to both your vehicle and yourself. When engaging in the process of jump-starting, consider these essential safety measures. First and foremost, always wear protective gear, such as gloves and safety glasses, to shield yourself from any potential sparks or electrical mishaps. Before connecting the jumper cables, ensure that both vehicles are turned off, preventing any electrical interference that could lead to hazards.
Adhering to proper precautions during the jump-starting process is paramount. Never attempt to jump-start a frozen or visibly damaged battery, as this can pose a serious risk. Prioritize the correct positioning of the jumper cables, connecting the positive clamp to the positive terminal of the dead battery and the negative clamp to an unpainted metal surface of the vehicle's engine block, away from the battery. Misplacement of the cables can lead to sparks, so take care to follow the correct sequence to reduce any potential dangers.
Additionally, it's vital to be aware of the specific safety recommendations provided by your vehicle's manufacturer and the jumping starter's guidelines. Some vehicles may have unique requirements, and using the wrong settings or methods can result in damage to the car's electrical system. Taking the time to familiarize yourself with the safety guidelines outlined in your car's manual and the portable jump starter's instructions ensures a smooth and secure jump-starting experience. By incorporating these safety measures into your routine, you not only protect yourself and your vehicle but also guarantee a successful jump start car without any unnecessary risks or complications. Remember, safety should always be the top priority when dealing with any automotive electrical components.
What Steps to Take After a Successful Jump Start?
After successfully jump-starting your vehicle, it's important to take a few additional steps to ensure optimal results and that your car is ready for normal operation. Firstly, let the recently jump-started car run for at least 10-15 minutes. This allows the alternator to recharge the battery fully. It's a good practice to rev the engine slightly during this time to speed up the charging process. While the engine is running, you can remove the jumper cables in the reverse order in which they were connected. Start by removing the negative cable from the booster car's battery, followed by the negative cable from the boosted car. Then, remove the positive cable from the booster car's battery and finally the positive cable from the boosted car. This sequence minimizes the risk of sparks.
As you let your car run, it's an opportune moment to inspect the battery's condition. If you have a multimeter, you can check the voltage to ensure that it's within the normal range. Additionally, pay attention to any warning lights on the dashboard. If they persist or if your car exhibits other electrical issues, it's advisable to consult a professional mechanic to diagnose and address potential underlying problems.
Once your car has run for the recommended duration, turn it off and attempt to restart it. If the engine starts without any issues, you've successfully completed the jump-start process. However, it's prudent to keep in mind that jump-starting is often a temporary solution. If your battery required a jump start, it may be time to replace it to prevent future inconveniences.
Finally, take a short drive to allow the alternator to further charge the battery. A drive of 20-30 minutes at varying speeds helps ensure that the battery is sufficiently charged for future starts. By following these post-jump start measures, you not only confirm the success of the jump start but also contribute to the overall health and longevity of your vehicle's electrical system.

How Often Should You Charge Your Portable Jump Starter?
Maintaining the readiness of your portable jump starter is key to ensuring it's a reliable tool when you need it most. While it might seem like a set-and-forget device, it's essential to follow recommended guidelines on how often to charge your portable jumper starter. Most manufacturers suggest charging it at least every three to four months, even if it hasn't been used. This periodic charging helps keep the internal battery in optimal condition, ensuring that it's ready to deliver the necessary power when called upon.
Regularly charging your portable jump starter isn't just about maintaining the device; it's also a matter of emergency preparedness. A well-charged jump starter provides peace of mind, knowing that you have a solution at your fingertips in case of a sudden battery failure. Consider integrating the charging routine into your calendar or setting reminders on your phone to make it a seamless part of your maintenance routine. Remember, a neglected jump starter with a depleted battery might not be as effective in critical situations, defeating its purpose as a reliable emergency tool.
Alongside scheduling your charging sessions, it’s important to routinely check the indicator lights or display on your portable battery booster. These indicators offer valuable insights into the current charge level and can alert you to any potential issues. If you spot any irregularities or find that the charge level is lower than anticipated, make sure to recharge the jump starter promptly. By taking a proactive stance on both charging and monitoring, you can ensure that your portable jump starter remains a reliable tool in your emergency kit, ready to assist you or another driver in need. Consistent charging not only extends the lifespan of the device but also solidifies its role as a dependable ally during unexpected roadside challenges.


