

A dead battery in a start-stop car can be a real drag. But don't fret! Jump-starting your vehicle is a straightforward process you can master. This article will explain how to boost a car and introduce you to a game-changer: the car jump starter power bank. This compact powerhouse offers a safe and easy way to get back on the road, ditching the need for a donor car and bulky jumper cables. Be prepared and discover the benefits of a car jump starter power bank – your pocket-sized roadside hero!
Jump-Starting a Start-Stop Vehicle
Preparing for the Jump Start
Before diving into the process, ensure you have the necessary tools:
- Jumper cables: Invest in a good quality set of jumper cables with thick enough gauge to handle the current needed for starting your car.
- Safety glasses: Protecting your eyes from potential sparks during the jump-start is crucial.
- Gloves: Wearing gloves provides an extra layer of protection against electrical hazards.
- A healthy donor vehicle: This vehicle should have a functioning battery compatible with your car's voltage (usually 12 volts).
- Important Note: While some sources suggest using a portable jump starter for start-stop vehicles, it's essential to check your car's owner's manual first. Some manufacturers advise against using portable jump starters due to potential compatibility issues with the car's sophisticated electrical system. If your manual allows it, a portable jump starter can be a convenient alternative to a donor vehicle, but always prioritize manufacturer recommendations.
Positioning the Vehicles
Once you have everything you need, park the donor vehicle close to the front of your car. Ensure the vehicles are not touching and maintain a safe distance to avoid accidental contact. Turn off both engines and engage the parking brakes for added safety.
Connecting the Batteries
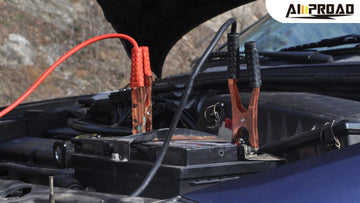
Now comes the crucial part: connecting the jumper cables in the correct order to avoid damage to the electrical systems. Remember, the red cables connect the positive terminals, while black cables connect the negative terminals. Here's a step-by-step breakdown:
- Positive Terminal Connection: With the red jumper cable, connect one end to the positive (+) terminal of the donor vehicle's battery. This terminal is usually marked with a red positive sign (+) or the word "POS."
- Positive Terminal to Dead Battery: Carefully connect the other end of the red cable to the positive (+) terminal of your car's battery. Locate the positive terminal on your battery; it will also be marked with a red positive sign (+) or the word "POS."
- Negative Terminal Connection: Pick up the black jumper cable. Connect one end of the black cable to the negative (-) terminal of the donor vehicle's battery. This terminal is usually marked with a black negative sign (-) or the word "NEG."
- Grounding the Negative Cable (Crucial for Start-Stop Vehicles): Here's a key difference for start-stop vehicles. Instead of connecting the other end of the black cable directly to the negative terminal of your car's battery, find a suitable grounding point on the chassis. This is typically a bare metal surface away from the battery, such as a bolt or bracket on the engine block. Connecting the negative cable directly to the negative terminal on a start-stop vehicle can potentially damage the car's computer system.
- Double-Check Connections: Once all the cables are connected, take a moment to double-check your work. Ensure all connections are secure and there are no loose wires or accidental contact points between the cables.
Starting the Engines
With everything in place, it's time to crank the engines.
Start the Donor Vehicle: First, start the engine of the donor vehicle and let it run for a few minutes. This allows the donor vehicle's battery to recharge and provide sufficient power for the jump-start.
Attempt to Start Your Car: After a couple of minutes, try to jump start your car's engine. If the engine cranks but doesn't turn over, wait a few more seconds and try again.
Success! If your car starts successfully, great! Let the engine run for a few minutes to allow your car's battery to begin recharging from the alternator.
Safe Removal of Cables: Once your car is running smoothly, it's time to remove the jumper cables in the reverse order they were connected. Important: Begin by removing the black cable from the grounding point on your car's chassis, followed by the black cable from the donor vehicle's negative terminal. Then, remove the red cable from your car's positive terminal, and lastly, disconnect the red cable from the donor vehicle's positive terminal.
Congratulations!
Using a Car Jump Starter to Boost the Car
In today's world, you don't always need another vehicle to jump-start your car. A car jump starter power bank such as that supplied by AMPROAD, sometimes referred to as a portable jump starter, can be a lifesaver. Here's why:
- It's a one-person job: You can use a car jump starter power bank on your own without relying on another vehicle.
- Convenience and speed: Jump-starting with a power bank is quick and straightforward.
- Recommended addition: Keeping a car jump starter power bank in your vehicle, stowed in the trunk, is a smart move. It can come to your rescue in an emergency.
Additional Tips:
- When using a battery pack battery booster, ensure that the black wire is not directly connected to the negative battery terminal; instead, it should be connected to the vehicle's body.
- While a car charging bank (power bank) is convenient, it may not start the car in all situations. It's advisable to carry jumper cables as a backup.
Finally, whether you choose to jump-start your start-stop vehicle using traditional methods or opt for the convenience of a car jump starter power bank, being prepared for battery-related emergencies is essential. Always prioritize safety and follow these guidelines to get your vehicle back on the road.