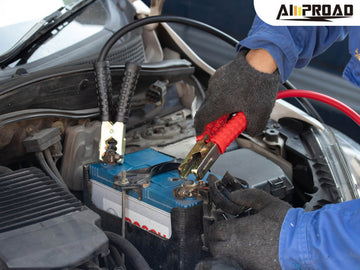
Jump starting a vehicle can be a daunting task, but with the right tools and instructions, it can be done safely and effectively. The NOCO GB40 Jump Starter and the AMPROAD 2000A portable iRock40 jump starter is a compact and powerful device designed to make jump starting your vehicle as simple and safe as possible. Here’s a comprehensive guide on how to use your NOCO GB40 Jump Starter.
Before Jump Starting
Before you start the process of jump starting your vehicle, there are a few essential steps to ensure your safety and the proper functioning of the NOCO GB40:
Turn Off All Vehicle Power Loads: Make sure all electronics such as headlights, radio, air conditioning, and other accessories are turned off. This reduces the load on your battery and the car booster pack.
Position the Vehicles: If you're jump starting another vehicle, park the vehicles close enough so that the jumper cables can reach. However, ensure they are not touching each other.
Consult the Vehicle’s Owner’s Manual: Always check your vehicle's owner's manual for specific jump starting instructions and any special precautions that might be necessary for your particular model.
Jump Starting with the NOCO GB40
Follow these steps to master the skill for how to boost a car using the NOCO GB40:
Connect the Clamp Assembly: Firmly attach the clamp assembly to the 12V output port on the GB40. This port is typically located on the side of the device.
Identify the Battery Terminals: Locate the positive (+) and negative (-) terminals on both the NOCO GB40 and your vehicle's battery. The positive terminal is usually marked in red, and the negative terminal is typically black. If unsure, consult your vehicle's manual.
Attach the Red Clamp: Connect the RED clamp from the GB40 to the POSITIVE (+) terminal on the DEAD battery. Ensure the connection is secure.
Attach the Black Clamp: Connect the BLACK clamp from the GB40 to a NEGATIVE (-) terminal of a grounded metal point on the disabled vehicle. This grounding point should be away from the battery and any fuel lines. Your vehicle's manual should suggest a recommended grounding location.
Power On the GB40: Press the power button on the GB40. All LEDs will flash, indicating a system check.
Check LED Indicators: If the connection is correct, the white Boost LED will illuminate. If the red Error LED lights up, it indicates the clamps are reversed or not connected properly. Correct the connection if necessary.
Start the Vehicle: Attempt to start the vehicle. Most vehicles should start immediately. If the vehicle doesn’t start, wait 20-30 seconds and try again. Avoid attempting more than five consecutive jump starts within a fifteen-minute period to prevent overheating or damage to the jump starter.
Disconnect the Clamps: Once the vehicle starts, disconnect the battery clamps in the reverse order of connection—remove the BLACK (-) clamp first, then the RED (+) clamp.
Power Off the GB40: After disconnecting, power off the GB40 to conserve battery life.
Additional Tips

If the Vehicle Doesn’t Start: If the vehicle doesn’t start after multiple attempts, there might be a more serious issue with the vehicle’s battery or other components. Consult a mechanic for further diagnosis.
Manual Override Function: The NOCO GB40 features a Manual Override function for situations where the battery voltage is too low for automatic detection. This function disables all safety features and should be used with caution. Refer to the GB40 user manual for detailed instructions on using this feature.
Recharge the GB40: After using the booster batterie, it’s crucial to recharge it. Use the provided USB cable to connect the Micro-USB end to the GB40 and the other end to a powered USB charger. A solid green Charge LED will indicate when charging is complete.
Safety Precautions
Safety should always be your top priority when jump starting a vehicle. Follow these precautions to ensure a safe operation:
Follow the Manual: Always adhere to the safety instructions provided in the NOCO GB40 user manual.
Avoid Sparking: Do not touch the positive and negative clamps together while they are connected to the battery. This can cause sparks and potentially ignite flammable materials.
Be Mindful of Flammables: Ensure there are no flammable materials or fluids near the battery when jump starting. This includes things like gasoline, oil, and other automotive fluids.
Proper Handling: Handle the GB40 and clamps carefully, and ensure connections are secure before attempting to jump start the vehicle.
Detailed Steps with Additional Insights
To provide a more comprehensive understanding, let’s break down each step with additional insights and tips.
Step 1: Connect the Clamp Assembly
The clamp assembly is a critical component of the NOCO jump starter GB40. Ensure the clamps are firmly connected to the 12V output port. This secure connection is necessary for efficient power transfer.
Step 2: Identify Battery Terminals
Proper identification of battery terminals is crucial. Incorrectly connecting the clamps can cause damage to the battery and the jumping starter. If the terminals are not clearly marked, consult your vehicle’s manual or look for color-coded caps or markings on the battery itself.
Step 3: Attach the Red Clamp
Attaching the RED clamp to the POSITIVE terminal is the first connection. This ensures that the electrical flow is directed properly. Ensure the clamp is attached securely and does not easily move.
Step 4: Attach the Black Clamp
The BLACK clamp should be connected to a grounded metal point rather than the battery’s negative terminal. This reduces the risk of sparks and provides a safe ground for the electrical current.
Step 5: Power On the GB40
Powering on the GB40 initiates a system check. The flashing LEDs indicate that the device is operational and ready to deliver a jump start. The system check helps in identifying any issues before you attempt to start the vehicle.
Step 6: Check LED Indicators
The white Boost LED signifies a successful connection and readiness to jump start. If the red Error LED lights up, it indicates a problem such as reversed polarity or poor connection. Recheck the clamp connections and ensure they are correctly placed.
Step 7: Start the Vehicle
When starting the vehicle, listen for the engine’s response. If it doesn’t start immediately, waiting for 20-30 seconds before trying again allows the battery booster to cool down and prevents overheating. If the vehicle still doesn’t start after multiple attempts, it may indicate a deeper issue that requires professional attention.
Step 8: Disconnect the Clamps
Disconnecting the clamps in the reverse order prevents sparking and ensures a safe disconnection. Always remove the BLACK clamp first, followed by the RED clamp.
Step 9: Power Off the GB40
Turning off the GB40 after use conserves battery life and prepares it for recharging. Ensuring the device is off before storing it also enhances safety.
Manual Override Function

The Manual Override function on the NOCO GB40 is designed for situations where the battery voltage is too low for automatic detection. This function can be lifesaving but comes with risks as it disables all safety features. Use it only when absolutely necessary and follow the manual’s instructions carefully.
Recharging the GB40
Keeping your GB40 fully charged is essential for it to function correctly when needed. Regularly check the charge level and recharge as necessary. Using the provided USB cable, connect the GB40 to a USB charger and monitor the Charge LED indicator. A solid green light indicates that charging is complete.
Maintaining Your Portable Power Source
The NOCO GB40 Jump Starter is a reliable and user-friendly device that can help you out of a sticky situation with a dead car battery. By following these steps and safety precautions, you can ensure a safe and successful jump start. Regular maintenance, such as recharging the device and proper storage, will keep your GB40 ready for use whenever you need it. Both the NOCO GB40 and AMPROAD 2000A iRock40 are valuable tools for any driver. However, like any device, proper maintenance is key. Remember to recharge your portable jump starter after use. Refer to the user manual for specific charging instructions. Regular maintenance, such as recharging and proper storage as outlined in the user manual, will ensure your jump starter is ready whenever you need it.
With a portable jump starter in your car, you can face a dead battery with confidence, knowing you have a reliable power source to get you back on the road quickly.


