

When Using Jumper Cables, What Is the Correct Order to Connect Them to the Batteries of Both Vehicles?
Jul 05, 2024
The dreaded dead battery scenario has struck. Fear not, for the humble jumper cables can come to your rescue. But before you dive in, it's crucial to understand the correct order for connecting these lifelines between vehicles. Let's unravel the mystery of jumper cable connection, ensuring you can get back on the road safely and swiftly.
Why Does the Connection Order Matter So Much?
You might wonder why there's such a fuss about the order in which you connect jumper cables. It's not just about being pedantic – there are real safety concerns at play. Connecting cables in the wrong sequence can lead to dangerous sparks, potentially damaging both vehicles' electrical systems or, in rare cases, causing the battery to explode. How to boost a car safely using the jumper cables? The correct order minimizes these risks by establishing a controlled electrical path between the two vehicles.
What Should You Do Before Even Touching the Cables?
Before you even reach for those jumper cables, take a moment to assess the situation. Ensure both vehicles are parked securely with their engines off and parking brakes engaged. Position them close enough for the cables to reach comfortably, but not so close that they're touching. This precaution prevents any unexpected movement during the jump-starting process.
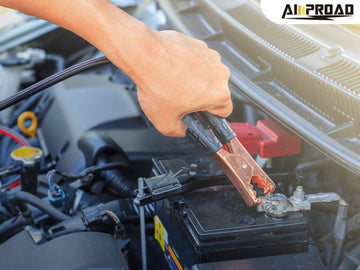
How Do You Identify the Battery Terminals Correctly?
Locating the correct terminals is your first step towards a successful jump start. Most car batteries follow a standard color-coding system: red for positive (+) and black for negative (-). However, don't solely rely on colors. Always double-check for the "+" and "-" symbols near the terminals. Some batteries might have protective covers over the terminals – gently remove these before proceeding.
What's the First Connection You Should Make?
Now, let's get down to business. The inaugural connection is crucial. Take the red jumper cable and attach one end to the positive (+) terminal of the dead battery. Ensure the clamp has a firm grip on the terminal – a loose connection can lead to ineffective charging or even sparking.
Where Does the Other End of the Red Cable Go?
With one end of the red cable securely fastened to the dead battery, it's time to create the positive connection with the donor vehicle. Stretch the cable to the running car and attach the other red clamp to its positive (+) terminal. This step establishes the first part of the electrical bridge between the two vehicles.
What's the Tricky Part About Connecting the Black Cable?
Here's where many people go wrong – and it's a critical step. You might assume the black cable should connect to the negative terminal of the dead battery, but that's not the case. Instead, attach the black clamp to the negative (-) terminal of the donor vehicle's battery. This seemingly counterintuitive move serves an important purpose.
Why Not Connect the Black Cable to the Dead Battery's Negative Terminal?
The reasoning behind this step is all about safety. By connecting the black cable to the donor car's negative terminal first, you're creating a controlled ground. If you were to connect it to the dead battery's negative terminal, you'd risk creating sparks near the battery, where hydrogen gas might be present. Such sparks could potentially ignite the gas, leading to a dangerous situation.
Where Should You Attach the Final Black Clamp?
For the final connection, you have options. Ideally, attach the remaining black clamp to an unpainted metal surface in the engine bay of the car with the dead battery. This could be a clean, unpainted bolt on the engine block or the car's frame. If you can't find a suitable grounding point, the negative terminal of the dead battery can be used as a last resort – but exercise extreme caution and be prepared for potential sparking.
How Long Should You Wait Before Starting the Vehicles?
Patience is a virtue, especially when jump-start a car. Once all connections are secure, start the engine of the donor vehicle and let it run for a few minutes. This allows the good battery to send some charge to the depleted one. During this time, you might want to lightly rev the engine of the donor car to increase the charge transfer.
What's the Process for Starting the Dead Car?
After giving the batteries time to interact, it's moment of truth time. Attempt to start the car with the dead battery. If it doesn't start immediately, don't panic. Give it another minute or two of charging from the donor vehicle, then try again. If the engine turns over but doesn't quite catch, you might need to give it a bit more time connected to the donor car.
What If the Car Still Won't Start?

If your car steadfastly refuses to start after several attempts, it's time to consider other culprits. A completely drained battery might need more time to charge, or there could be underlying issues beyond a simple battery drain. In such cases, it's wise to seek professional help to diagnose the problem accurately.
How Do You Safely Disconnect the Jumper Cables?
Assuming your car has roared back to life, it's time to disconnect the jumper cables. But hold your horses – the order of disconnection is just as important as the connection sequence. Start by removing the black clamp from the grounded metal surface (or negative terminal) of the previously dead car. Next, detach the black clamp from the donor car's negative terminal. Then, remove the red clamp from the donor car's positive terminal. Finally, disconnect the red clamp from the revived car's positive terminal.
Why Is the Disconnection Order Important?
The disconnection order matters because it minimizes the risk of sparks or electrical arcing as you remove the cables. By disconnecting the ground (negative) connection first, you're breaking the circuit in a controlled manner. This reduces the chance of any stray electrical current causing issues as you remove the remaining connections.
What Should You Do After Successfully Jump-Starting Your Car?
Once your car is running, it's tempting to immediately shut it off and go about your day. Resist this urge. Instead, keep the engine running for at least 15-20 minutes. This allows the alternator to recharge the battery properly. If possible, take the car for a short drive. This not only helps charge the battery but also gives you a chance to ensure everything is functioning correctly.
Are There Any Alternatives to Traditional Jumper Cables?
While jumper cables are a tried-and-true method for reviving a dead battery, they're not the only option in town. Portable jump starters, like the AMPROAD high-quality portable jump starter iRock 40, have gained popularity in recent years. These compact devices pack enough punch to jump-start a car without needing a donor vehicle. They're especially handy for solo drivers or those frequently traveling in remote areas. AMPROAD's iRock 40 offers reliable performance, ensuring peace of mind when facing unexpected battery issues on the road.
What Safety Precautions Should You Always Keep in Mind?
Jump-starting a car, while generally safe when done correctly, still involves working with electrical systems. Always wear safety glasses to protect your eyes from potential sparks or battery acid. Keep your face away from the batteries while making connections. If you notice any signs of battery damage, such as cracks or leaks, abort the jump-start attempt and call for professional assistance.
How Can You Prevent Future Battery Woes?
An ounce of prevention is worth a pound of cure, as the saying goes. Regular battery maintenance can save you from future roadside headaches. Keep the battery terminals clean and free of corrosion. If your vehicle sits unused for extended periods, consider using a battery maintainer. Pay attention to warning signs like slow engine cranking or dimming headlights, which could indicate a weakening battery.
Lastly, jump-starting a car with jumper cables is a valuable skill that can save the day in a pinch. By following the correct connection sequence – positive to dead, positive to donor, negative to donor, then ground – you ensure a safe and effective jump start. Remember, the order of operations isn't just a math concept; it's crucial for automotive electrical work too. With this knowledge in your toolkit, you're well-equipped to handle one of the most common roadside emergencies. Stay safe, stay charged, and keep rolling! Remember, while jumper cables are a handy tool, for those seeking a safer and more convenient alternative, portable car jump starter is becoming increasingly popular. They offer a compact, self-contained solution for emergency situations.